Terracotta pots are a timeless and versatile staple in both indoor and outdoor gardening. While they are beautiful in their natural reddish-brown color, painting them can give a fresh, personalized touch to your green spaces. Here we present 8 terracotta pot painting ideas to unleash your creativity.
With a wide variety of painting techniques and design ideas available, there’s no limit to the creativity you can showcase on your terracotta pots. Before you start though, it’s essential to know the proper steps to prepare and paint your terracotta pots to ensure the best results.
From cleaning and priming the pots to selecting the right type of paint and sealant, these preparations are crucial for a professional-looking outcome. Whether you are inspired by geometric shapes, organic lines, or bold colors, there is a plethora of ideas to choose from. Techniques like color blocking, marbling, or even adding metallic accents can turn simple terracotta pots into vibrant statement pieces.
These customized pots not only enhance your plants’ visual appeal but can also serve as wonderful gifts or a unique addition to your home and garden decor. So, pick up your paintbrush and let your creativity flow to enhance the charm and character of your terracotta pots.
Preparing Your Workspace
Before starting your terracotta pot-painting project, it’s essential to set up a proper workspace to ensure a smooth process and professional-looking results. A clean, well-organized, and adequately ventilated area will help you work more efficiently and safely.
Begin by covering your work surface with a protective layer such as newspaper or kraft paper to prevent paint spills and stains. If you’re using spray paint, aluminum foil can also be an excellent alternative, as it’s resistant to the paint and easy to clean up afterward.
Make sure your workspace is well-ventilated to allow any paint fumes to disperse. Open windows or doors and use a fan or other means to promote airflow. Adequate ventilation helps protect you from inhaling potentially harmful chemicals and ensures the paint dries properly.
Before painting the terracotta pots, it’s crucial to clean them thoroughly to remove any dust, dirt, or residue. Using a microfiber cloth, gently wipe the pots to get rid of any particles on the surface. If necessary, you can also use water and mild detergent to clean them. Make sure they’re completely dry before you start painting.
Organize all your painting materials, including brushes, paint, sealers, and any decorative items, so they’re easily accessible. Having everything within reach will streamline your work process and minimize the chance of accidents, such as spills or knocking over supplies.
With a well-prepared workspace, you’ll be able to confidently and efficiently tackle your terracotta pot painting project. Just remember to work in a clean, ventilated area and have all your supplies organized and ready for use.
Choosing the Right Supplies
When painting terracotta pots, it’s important to select the appropriate supplies to ensure a lasting and vibrant result. The first step in this process is choosing the type of paint. Both acrylic and craft paint work well for terracotta pots. Patio paint is specifically designed for outdoor pottery and can also be used. If you prefer an antique look, try using chalk paint instead.
Before applying paint to the pot, it’s essential to prepare the surface to achieve better adhesion. Clean the pot thoroughly to remove any dust or dirt. Then, apply a primer to the pot to create a smooth surface. A paint primer designed for clay pots can ensure better adhesion of the paint to the pot’s surface.
Next, gather quality paintbrushes in various sizes to cover different areas of the pot. Using the right paintbrush will help provide a smoother, even coat of paint. When painting more intricate designs, finer paintbrushes can provide better control and precision.
After the paint has dried, it’s important to protect the finished pot with a sealant. A clay pot sealer or self-sealing acrylic paint can be used to shield the paint from moisture and reduce the chances of paint peeling or fading. This step is crucial, especially if the painted pots will be used outdoors or exposed to humidity.
In summary, choosing the correct supplies for painting terracotta pots involves selecting the right type of paint, using a primer, picking suitable paintbrushes, and applying a sealant for protection. Follow these steps to create beautifully painted pots that will last and withstand various conditions.
Cleaning and Priming Terracotta Pots
Before starting any terracotta pot painting project, it is essential to properly clean and prime the pots. This ensures a smooth surface for the paint to adhere to. Even brand-new pots may have sticker residue or manufacturing residues, while older pots might have dirt or dust.
To clean terracotta pots, first, run them under water and lightly scrub them with a cleaning brush or a pot brush. You can use dish soap or diluted vinegar to remove any stubborn residue, ensuring that the pot is free from contaminants. Make sure to rinse the pot thoroughly and allow it to air dry completely before proceeding with the next steps.
Priming terra cotta pots is vital as it helps establish a base coat for the paint, enhancing the colors and ensuring the longevity of your design. To prime the pots, use an all-purpose primer designed for terracotta materials. Apply the primer evenly over the entire surface of the pot, and wait for it to dry according to the manufacturer’s instructions. It is essential to work in a well-ventilated area and cover the workspace with kraft paper or newspapers to protect it from any accidental spills or overspray.
Once the terra cotta pots have been cleaned and primed, you can proceed with your painting ideas and techniques. Use acrylic paint specifically designed for terracotta surfaces to ensure high-quality results. The possibilities are endless, from simple patterns to intricate designs. Regardless of the design you choose, the key to a successful terracotta pot painting project lies in proper preparation and priming.
Designing Your Pot
When it comes to creating a unique and eye-catching terracotta pot, design plays a crucial role. First, you’ll need to find your inspiration. This can come from various sources, such as nature, art, or even your favorite colors. Spend some time browsing pot painting ideas or gathering images that resonate with your style and preferences. Remember, the goal is to create a design that enhances the beauty of your plants and complements your home decor.
One useful tool for achieving a beautiful design is stencils. Stencils can be purchased in a wide array of patterns and motifs, or you can create your own by cutting out shapes from reusable materials like plastic sheets or cardboard. Using stencils to create intricate and detailed patterns makes it easy to achieve a professional-looking result.
In addition to stencils, choosing the right color palette is essential for a cohesive design. Terra-cotta pots naturally have an earthy, warm tone that can complement a variety of colors. Opt for muted shades, earthy neutrals, or bold color combinations to create a striking contrast with the pot’s natural hue. You can try color-block terracotta pots for a modern and visually appealing design.
Lastly, don’t be afraid to experiment with different techniques and styles. For example, try incorporating texture into your design with various brush strokes, sponges, or painting techniques. The possibilities are endless, so let your creativity shine, and have fun personalizing your terracotta pot.
Easy Painting Techniques
Using Painter’s Tape and Rubber Bands
Utilizing painter’s tape and rubber bands is a simple and efficient way to create clean, straight lines and geometric patterns on your terracotta pots. First, ensure your pot is clean and dry, then apply painter’s tape to create your desired design or pattern. If you want more flexibility or curved lines, use rubber bands instead of tape. After you have applied the tape or rubber bands, carefully paint the exposed areas with your choice of acrylic paint, and then let it dry completely before removing the tape or bands to reveal your finished design.
Aged Look Technique
To give a terracotta pot an aged look, you can incorporate techniques such as sanding, dry brushing, and applying layers of paint to create a weathered appearance. Begin by painting a base color on the entire pot, and let it dry completely. Next, use a dry brush dipped in a contrasting color of paint, such as white or gray, and gently brush it onto the surface of the pot, focusing on raised areas and edges. Lastly, you may use sandpaper to distress the surface and create a more natural and worn look.
Ombre Effect
The ombre effect is a popular gradient coloring technique that can elevate the appearance of terracotta pots. Choose two or more colors that complement each other and mix them into a gradient range on a palette or mixing tray. Start by applying the darkest color at the bottom of the pot, and then blend it into the next shade. Continue this process until you reach the lightest color at the top of the pot. Ensure that you maintain smooth transitions between shades while working quickly so the paint doesn’t dry mid-transition.
Marble Effect
Creating a marble effect on terracotta pots is a unique way to add sophistication and style to your plants. One approach to achieve this effect is by using acrylic pour paints. Start by selecting two or more colors that synergize well and mix them with pouring medium in separate containers. Pour the colored mixtures onto the pot’s surface, creating swirling patterns by tilting and rotating the pot. This technique can be a bit messy, so make sure to protect your work surface and let the pot dry thoroughly before handling.

Fun and Creative Ideas
Polka Dots and Stars
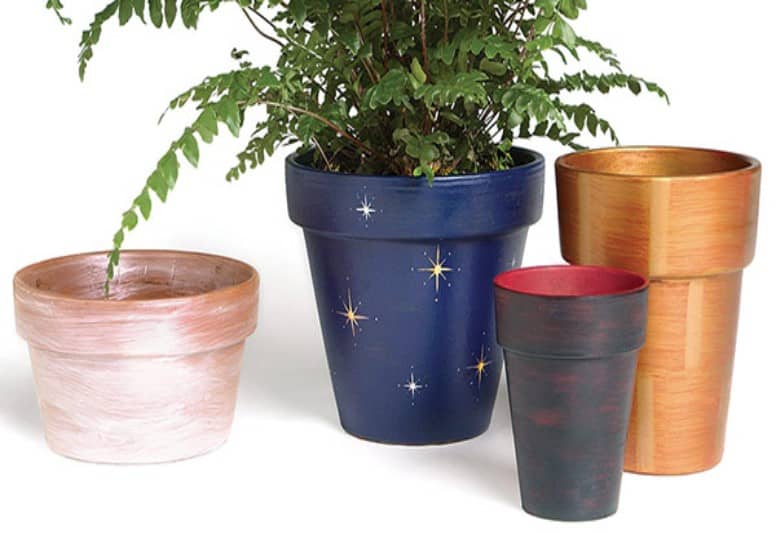
Make your terracotta pots stand out with fun and playful polka dots or stars. This easy design can be achieved using stencils or freehand painting with acrylic paint. Choose from a variety of color combinations that match your décor and fill your pots with plants that complement the design. For a more eye-catching effect, you can even use metallic paints or glitter to make your polka dots or stars shine.
Chalkboard Paint
Chalkboard paint is another innovative idea that you can use to customize your terracotta pots. Simply apply a layer of this specialty paint onto the surface of your pots, and let it dry. Once the paint is completely cured, you can write or draw messages and designs with chalk on the pot. This is a great way to label your plants, add a quote, or change up the design as often as you like. To clean the designs, just wipe with a slightly damp cloth, and you’re ready to create something new.
Rainbow Painted Flower Pots
Add a pop of color to your garden or home with rainbow-painted flower pots. Use a variety of bright, lively colors to paint horizontal or vertical stripes on the pots. You can also create an ombre effect by gradually blending the colors together. Another creative way to use these colors is to paint each pot in a different hue, creating a whole rainbow collection. This vibrant design is perfect for displaying lively, colorful plants or flowers.
Patterned Plant Pots
Get inspired by various designs and patterns to create unique and stylish patterned plant pots. Experiment with geometric shapes, intricate motifs, or even simple horizontal lines to give your terracotta pots a fresh and contemporary look. Use stencils, painter’s tape, or simply paint freehand for a more organic feel. This technique allows for endless possibilities, and you can mix and match different patterns to create a collection of one-of-a-kind plant pots that reflect your personal style.
Finishing Touches
Adding the perfect finishing touches to your terracotta pot painting project can elevate a simple design to a stunning work of art. Whether you’re a beginner or an experienced artist, these simple techniques and materials can help you achieve a professional and impressive outcome.
One way to enhance your painted terracotta pot is to add a touch of sparkle with glitter flower pots. To create this stunning effect, simply apply a coat of craft glue or Mod Podge to the painted area where you’d like the glitter to be, and then sprinkle your choice of glitter over the adhesive. Shake off any excess glitter, and let it dry. This technique works best for small accent areas, as it adds a touch of glamour without overwhelming the design.
Another unique way to personalize your terracotta pot is to incorporate natural elements, such as seashells, to create a shellac flower pot. By attaching seashells to the pot with a strong adhesive, you can create a coastal-inspired design that adds a touch of whimsy. For added protection and to seal your design, simply apply a layer of shellac or clear varnish to the entire pot, ensuring a durable and long-lasting finish.
Here are some tips to remember when adding finishing touches to your painted terracotta pots:
- Experiment with different materials, including glitter, shells, beads, or small stones, to find the perfect style for your home or garden setting.
- Always use a strong adhesive to ensure your embellishments stay in place, especially if your pot will be placed outdoors.
- Seal your design with a clear coat of shellac or varnish to protect it from water damage, weather, and everyday wear and tear.
- For the best results, ensure your terracotta pot is clean and completely dry before painting and adding embellishments.
Remember, the finishing touches are more than just decorations – they’re your chance to put a personal stamp on your creative project and showcase your artistic flair. So go ahead, don’t be afraid to experiment, and enjoy the process!
Caring for Painted Terracotta Pots
Painted terracotta pots can elevate the aesthetic appeal of your indoor plants and container gardens. To maintain their appearance and avoid damage, it’s important to take proper care of your painted pots.
Terracotta is a porous material, meaning it absorbs water easily. This property makes it ideal for succulents in particular, as these plants require good drainage. However, prolonged moisture exposure can lead to paint chipping away or the pot cracking. To avoid such issues, use a saucer or tray under the pot to catch excess water. You can also use a clear sealant on the exterior of the pot to protect the paint without hindering the terracotta’s natural moisture-wicking capabilities.
When selecting a pot for your indoor plants, consider using ceramic pots as an alternative to painted terracotta pots. Ceramic pots are non-porous and less likely to damage the paint over time. Moreover, their glazed surface offers additional protection against moisture and scratches.
When repotting your plants, handle your painted terracotta pots cautiously to avoid chipping the paint. First, gently remove the plant by turning the pot upside down and holding it onto the plant’s base while tapping the rim of the pot on a soft surface. Afterward, you can transfer the plant and its soil to the new container.
Talking about soil, it’s essential to use the right combination depending on the plant you’re growing. For instance, succulents and cacti require a well-draining soil mix to prevent root rot. On the other hand, tropical plants may benefit from a more moisture-retentive soil mix.
Creating a visually stunning arrangement of painted terracotta pots with a variety of plants can enhance the character of your indoor or outdoor living spaces. By following these tips, you can easily maintain the beauty and durability of your painted pots, showcasing your creative flair and love for gardening.
Frequently Asked Questions
What are some creative designs for painting terracotta pots?
There are countless creative designs to try when painting terracotta pots. You can experiment with mixing colors, patterns, and styles to create unique, eye-catching designs. From simple geometric shapes to intricate floral patterns and colorful boho-inspired designs, your options are almost endless. Use your imagination and express your artistic skills through pot painting.
Which techniques work best for decorating terracotta pots?
Several techniques can be used for decorating terracotta pots. Some popular ones include stenciling, sponging, marbling, and using a hydro dip technique for a realistic marble finish. Depending on your preference and skill level, you can choose from these techniques to achieve your desired design. Just be sure to use appropriate paint types and sealers to ensure a long-lasting result.
What types of paint are suitable for terracotta pots?
When painting terracotta pots, it’s essential to use paints that adhere well to the porous surface of the clay. Acrylic, latex, and outdoor craft paints are generally suitable options. Remember, always select paints that are water-resistant and non-toxic to ensure that your pots withstand various weather conditions and are safe for plants.
Do I need to prep my terracotta pot before painting?
Preparing your terracotta pot before painting helps to create a smoother and more durable surface. To start, clean your pot by removing any dirt, debris, and stickers. If your pot is new or has an especially smooth surface, consider lightly sanding it with fine-grit sandpaper to help the paint adhere better. Make sure to clean off any sanding dust before applying your paint.
How can I use Sharpies to decorate clay pots?
Sharpies are a versatile and easy-to-use tool for decorating clay pots. You can outline your painted design with a black Sharpie for a more finished look or create intricate patterns directly onto the terracotta surface. However, it’s crucial to use oil-based Sharpie markers rather than the standard water-based ones to ensure that the ink doesn’t bleed or smudge over time. Once you’ve finished your design, don’t forget to seal and protect your pot with a clear, water-resistant sealant.
What steps should I follow to seal my painted terracotta pot?
After your painted design is dry, you’ll want to make sure it’s protected by sealing the pot. First, choose a clear, water-resistant sealer, either a spray-on or brush-on formula, specifically designed for use on terracotta and painted surfaces. Before applying the sealer, read the manufacturer’s instructions for proper application and the recommended number of coats. Generally, you’ll want to apply at least two coats, allowing the sealer to dry completely between applications. Sealing your pot ensures that your paint won’t chip or fade and protects the terracotta from moisture.