Creating a DIY fairy house is a delightful way to engage your imagination and bring a touch of whimsy to your garden or indoor space. These enchanting miniature dwellings are not only fun projects for children and adults alike, but they can also foster a sense of wonder and provide a welcome escape from the daily grind. With just a few simple materials, you can design and build a magical retreat for your very own fairies, and customize it to your heart’s content.
There is no shortage of design inspiration when it comes to crafting your fairy house. You can browse online sources, capture ideas from nature, or simply let your creativity run wild. The key is to envision the style and feel of the magical abode before beginning your project. Some popular fairy house styles include rustic cottages, turret-adorned castles, and whimsical rounded structures adorned with leaves and twigs. Once you have an idea of the theme you want for your fairy house, you can gather materials and embark on the exciting journey of bringing your creation to life.
DIY Fairy House – What You Need & How To Do
Essential Materials
Creating a DIY fairy house can be a fun and magical experience. To get started, you’ll need a variety of materials at hand. Many of these materials can be found in nature or around your household.
Natural materials are a popular choice for constructing fairy houses. For instance, you can use sticks to form the walls and structure of the dwelling. Twigs and leaves can be glued onto the craft stick walls to add a touch of whimsy and blend seamlessly with the outdoor environment. The Spruce Crafts suggests searching your yard for a large, flat base to begin your project.
Wood can be a versatile material, as it can be easily shaped and holds up well outdoors. Bark and wood chips make excellent additions to your fairy house, as they can mimic the appearance of shingles for roofs. A great natural roofing material to consider using are pinecones – by pulling them apart, you can create unique roof tiles for Fairy Garden DIY.
Stones also offer an attractive and sturdy option for walls or pathways. You can use various sizes of stones to create interesting textures and patterns in your fairy house. Stacking flat rocks can create a natural-looking boundary wall or decorative planter for your miniature garden.
For those wanting to create a fairy house for indoor display, utilizing materials like cardboard and heavy paper will provide a lightweight and cost-effective alternative. As described by MyGardenLife, cardboard, and heavy paper provide an easy-to-work-with base for your house structure.
Clay is another versatile material you can use for a DIY fairy house. Moldable and easy to shape, clay can be used for a wide variety of elements, such as doors, windows, or ornamental details. Both natural clay and synthetic polymer clay offer flexibility and creativity in the construction process.
In conclusion, essential materials for creating a DIY fairy house include natural materials like wood, stones, bark, and sticks, as well as more lightweight alternatives like cardboard and clay. By combining these elements, you can create a unique and enchanting fairy house that captures the imagination.
Building the Base
When creating a DIY fairy house, building a strong and stable base is essential. The base serves as the foundation of your fairy house and sets the theme for your entire project. Whether you prefer a naturalistic garden setting or an elaborate container fairy garden, establishing a solid base ensures the longevity and overall visual appeal of your fairy house.
For a garden-based fairy house, choosing the right location in your yard or garden is paramount. An ideal spot could be near a tree stump, which can serve as a tree stump fairy house. This not only provides a sturdy foundation but also creates an enchanting atmosphere for your fairy residents.
Another natural option is to build your fairy house around a gourd. Gourds can be hollowed out and decorated to create charming gourd fairy houses. Just make sure to properly clean and dry the gourd before starting your project. You may also want to use a waterproof sealant to prolong the life of your gourd fairy house.
If you prefer a more versatile and portable option, consider creating a container fairy garden. This approach enables you to build your fairy house within a container, such as a planter or an old wheelbarrow. Container fairy gardens are easy to move and rearrange according to your preferences, and they also provide excellent drainage for any plants you incorporate into your project. You can choose from various sizes and styles of containers to suit your overall design.
In conclusion, regardless of the approach you choose, ensuring that your base is well-anchored and stable will guarantee the success of your DIY fairy house project. With a secure foundation in place, you can let your creativity run wild and create a magical haven for your fairy friends.
Creating the Structure
When building a DIY fairy house, start by envisioning the overall structure and design. Begin with the base, which can be made from a variety of materials such as wood, clay, or even an old flower pot. Choose an appropriate size and shape for your fairy house, and make sure it can comfortably accommodate the intended features, such as doors, windows, or distinct architectural details.
Next, focus on constructing the walls and roof. This can be achieved using tree bark or other natural materials that blend well with the environment. Consider using scissors or a utility knife to shape and trim the bark to perfectly suit your design. Attach the walls using hot glue or another strong adhesive that will hold the materials securely in place.
For roofing material, choose a durable and visually appealing option like small twigs, leaves, moss, or even paper. This will not only provide shelter but also add an extra layer of charm and fantasy to your creation. Layer the roof material in an overlapping pattern to ensure proper coverage and protection for your fairy house’s interior.
Doors and windows are important aspects of a fairy house structure. They provide an entryway for fairies and allow light to penetrate the interior space. For the door, choose a sturdy material like trimmed bark or thin wooden planks. Design it in a manner that complements the overall fairy house aesthetic. Attach small twigs or toothpicks as makeshift hinges and use a tiny button, bead, or gemstone for a door handle.
Incorporating windows can enhance the appeal of your fairy house. Use a utility knife to carefully carve out window openings from the structure’s walls. Alternatively, you can create windows using sticks or twigs, arranging them to form a simple lattice pattern resembling window panes. Secure the windows in place using hot glue or other adhesives.
By giving careful thought to materials and design, you can build a captivating and sturdy structure for your DIY fairy house. Remember to keep it creative, enchanting, and magical, as it will serve as a unique and cherished element in your garden or home decor.
Attaching the Roof
When creating a DIY fairy house, attaching the roof is an important step that ties the entire structure together. There are various materials you can use to construct the roof, including moss, leaves, and cardboard. A well-fitted roof adds stability and charm to your fairy house.
Begin by selecting the material for your roof. Moss is a popular choice due to its natural appeal and ability to blend seamlessly with the surroundings. Ensure the moss is dry before attaching it to your fairy house. Using a strong adhesive like wood glue or hot glue, apply a small amount to the underside of the moss and press it onto the roof structure, working from the bottom up. Overlap the moss slightly to ensure proper coverage and to create a realistic effect.
If you prefer using leaves as your roof material, they can be easily sourced from your garden or nearby parks. Choose sturdy, dry leaves for durability. Attach the leaves to the roof structure in a similar manner to moss, working from the bottom of the roofline upwards, overlapping each leaf for a natural appearance. The leaves can be secured with glue or, for a more rustic look, consider using thin twine or thread to sew the leaves to a cardboard backing.
Cardboard can also be used as a base for your fairy house roof. Cut the cardboard into the desired size and shape, and ensure it fits snugly on your fairy house. You can decorate the surface with paint, fabric, or other materials in addition to moss or leaves. Once your cardboard roof is decorated to your liking, attach it to the main structure using glue or small nails.
Regardless of your chosen roof material, always ensure the edges are properly sealed, and the roof is securely attached to the fairy house. A sturdy roof will keep your fairy house looking enchanting for a long time, capturing the imaginations of young and old alike.
Fairy House Exterior Design
Fairy houses can be a charming addition to your garden or a lovely decoration for your home. Creating a beautiful exterior design for your fairy house can be quite easy using a variety of materials and techniques.
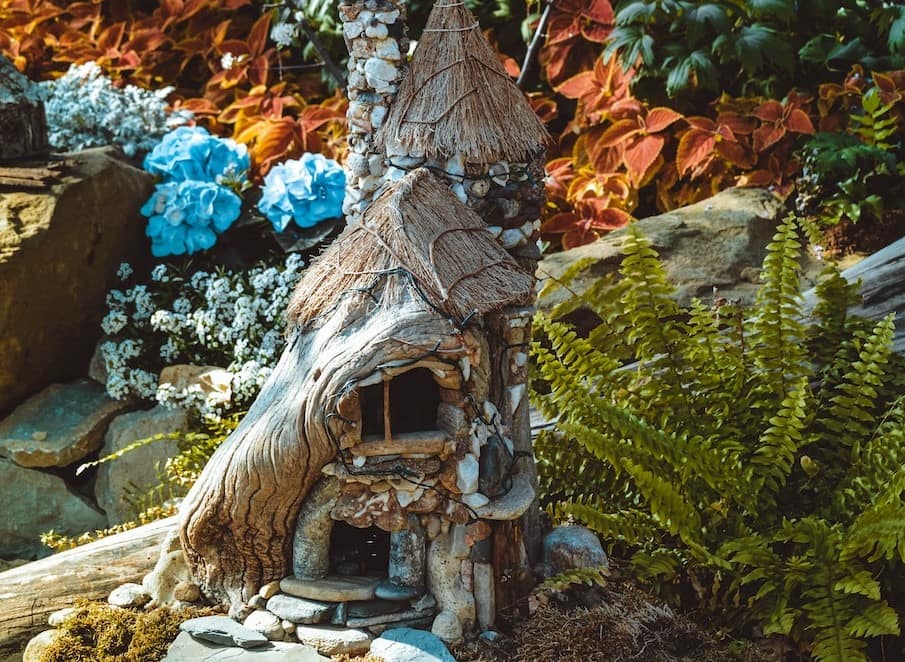
One popular approach to designing fairy homes is by utilizing natural materials found in your surroundings. A twig fairy house can be made using twigs, leaves, and bark arranged artfully to create a unique, rustic appearance. Adding, small stones or moss can give your fairy house a more earthy appeal. You can also build a stone fairy house by collecting rocks and arranging them to create walls and a roof for your house. This type of design is perfect for an outdoor fairy garden, where it can blend seamlessly with the environment.
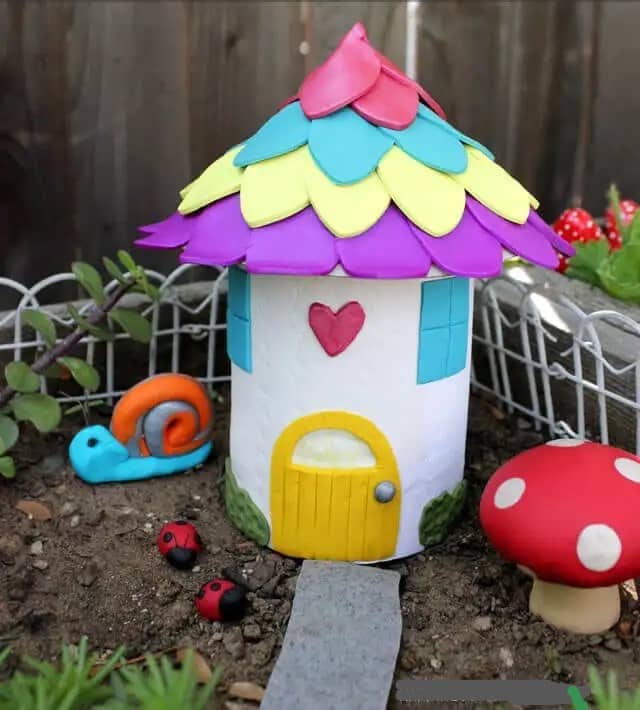
For a more whimsical touch, you may choose to incorporate paint and glitter into your design. Using different colors and patterns, you can create a fairy house with a vibrant exterior that immediately grabs attention. Glitter can add a hint of sparkle and magic to any design, making your fairy home truly enchanting. However, remember not to overdo the glitter, as subtlety can go a long way in enhancing your design.
Here are a few ideas to enhance the exterior of your fairy house:
- Natural materials: Collect twigs, leaves, bark, moss, and stones from your yard or nearby wooded areas to incorporate into your design.
- Texture: Create interesting patterns by layering different materials, such as mixing twigs and stones, or placing pebbles between layers of bark.
- Color: Choose a color scheme that complements your chosen materials and reflects the overall theme you wish to achieve.
- Details: Adding small embellishments, such as miniature windows, doors, or flower boxes, can give your fairy house a touch of personality and charm.
In conclusion, designing the exterior of your fairy house is an enjoyable project that allows you to express your creativity using various materials and techniques. Whether you choose a more natural, earthy design or one that is more vibrant and whimsical, the key is experimenting with different materials and embracing your own unique design vision.
Fairy House Interior Design
Creating a cozy and inviting interior for your DIY fairy house is a crucial aspect of the overall design. With a touch of imagination and the right materials, you can transform the inside of your fairy house into a magical space for the fairies to enjoy.
One essential element of interior design is the furniture. Miniature furniture pieces such as chairs, tables, and beds can be crafted from natural materials like twigs, acorns, and pebbles. You may also repurpose small household items, like bottle caps or matchboxes. Feel free to decorate the furniture with moss, leaves, or even tiny fabric pieces for added charm.
Adding doors to your fairy house will not only provide a sense of privacy but also enhance the overall aesthetics. You can utilize sticks or bark for the door frame and use materials like leaves or petals for the door itself. Don’t forget to include a miniature handle, like a tiny pebble or a piece of wire.
Keep in mind that fairies appreciate attention to detail; therefore, integrating quirky elements that personalize the space will make it more enchanting. Include elements such as tiny paintings, miniature bookshelves with minuscule books, or even a small fireplace made from rocks and twigs.
Make the most of the indoor space by using multiple levels and platforms for added depth in your fairy house. You can create miniature staircases, balconies, or lofted areas for the fairies to explore. Ensure that the design is practical and allows for easy access between different areas of the house.
When designing the interior, it’s essential to be mindful of the various designs that can be employed. While some prefer a rustic and natural look, others may opt for a more whimsical or contemporary flair. Personalize the design by matching it with the fairy house exterior style, or create an eclectic mix by combining elements that are meaningful to your fairies.
Designing a captivating interior for your DIY fairy house is an opportunity to let your creativity shine. With confidence, knowledge, and a clear vision, you can create a space that is not only beautiful but also delightfully magical for your fairies.
Additional Elements
Adding a few extra elements to your DIY fairy house can make all the difference, giving it a more authentic and magical feel. By incorporating items such as chimneys, fences, planters, birdhouses, and more into your design, you can enhance the overall appearance of your enchanting creation.
Chimneys can be made using small sticks or twigs, giving a cozy and rustic vibe to your fairy house. Secure the sticks together and attach them to the roof, making sure it’s proportionate with the rest of the structure.
Fences are another important element to consider. They can be created from a variety of materials, such as sticks, twigs, or even wire. Fences not only add charm to your fairy house, but they also help define the borders of the garden, keeping it neat and orderly.
Adding planters brings a touch of nature and color to your fairy house. They can be made using small containers, or even crafted with natural materials like acorns or tiny shells. Fill the planters with miniature plants, flowers, or moss to create a vibrant living environment.
Birdhouses are a cute addition that can attract real-life birds, further enhancing the magical atmosphere. They can be made using small pieces of wood, popsicle sticks, or even recycled materials. Hang them on nearby trees or attach them to your fairy house for a charming touch.
Incorporating sticks or trees into the structural design of your fairy house adds a touch of whimsy and connects it to the surrounding natural environment. Consider using larger twigs or small branches as supporting elements in the walls or as decorative accents on the exterior.
Pathways and stepping-stones are essential elements for guiding fairies and visitors around your magical garden. Create them using pebbles, small stones, or even natural materials like tree bark, leaves, or moss. Make sure the pathways are clear and easy to navigate, enhancing the experience for both fairies and human admirers alike.
By carefully selecting and incorporating these additional elements, your DIY fairy house will be transformed into a captivating and delightful wonderland. Remember to stay confident, knowledgeable, and neutral throughout the process, ultimately creating a clear and enchanting display for all to enjoy.
Assembling and Securing
Assembling a DIY fairy house requires the right materials and tools to ensure a sturdy and lasting structure. In this process, you’ll need to select an appropriate adhesive, as it plays a significant role in keeping your fairy house together. There are various types of adhesives to choose from, such as glue, wood glue, hot glue gun, silicone sealant, and other adhesives.
When working with materials like wood, twigs, or bark, a strong bond is essential for durability. In such cases, wood glue is an excellent option, as it’s formulated to bond with porous materials, creating a secure connection. Make sure to follow the manufacturer’s instructions for application and drying times to achieve the best results.
Using a hot glue gun is another popular choice for assembling fairy houses. This adhesive tool melts glue sticks, which quickly solidify upon cooling, allowing for a rapid and secure bond. However, be cautious when using hot glue guns, as they can cause burns if not handled properly. Consider using gloves and always work on a heat-resistant surface.
If you plan to build a fairy house that’s exposed to the elements or is in a moist environment, a silicone sealant may be the ideal choice. This adhesive is waterproof, flexible, and durable, making it perfect for outdoor fairy houses. It can adhere to various surfaces, including glass, wood, and plastic. Just ensure to follow the instructions for usage and curing times.
Selecting the right adhesive for your DIY fairy house is crucial for a long-lasting and sturdy structure. Whether you’re using wood glue, a hot glue gun, or silicone sealant, make sure to follow the manufacturer’s instructions and take necessary safety precautions during assembly. This approach will guarantee a successful fairy house-building experience while maintaining a confident, knowledgeable, neutral, and clear tone of voice.
Customizing and Decorating
Creating a DIY fairy house allows you to tap into your creativity and design a unique, personalized space for your garden’s magical inhabitants. By using various materials and styles, you can make your fairy house as simple or as elaborate as you wish.
First, consider the main structure of your fairy house. Sticks and stones provide a natural, rustic appearance while using leaves for roofing can give it a whimsical touch. To make it more sturdy and weather-resistant for outdoor use, you may opt for craft sticks or a combination of natural materials and adhesives. Remember to keep the house’s overall style in mind, as you may want a cozy cottage vibe or something more castle-like and grand.
When it comes to decorating, pebbles can serve as an excellent addition to pathways or as a border for a small garden around the fairy house. Acorns can also be used in a variety of ways, such as miniature bowls or containers, or even as a design ornament on the house itself, giving it a more woodland feel.
Don’t be afraid to add some sparkle to your fairy house with glitter. This can be applied as accents on windows, doors, or roof edges. Glitter instantly adds a magical touch to any fairy house design and can really make it stand out in your garden.
Finally, choose colors and accessories that complement your chosen style. Whether you prefer a more natural look with earth tones and organic materials or a brighter color palette with miniatures and ornaments, your fairy house should showcase your creativity and personal taste. Remember that the most important aspect of customizing and decorating a DIY fairy house is to enjoy the process and let your imagination soar.
Tips for a Long-lasting Fairy House
Creating a long-lasting fairy house requires a careful selection of materials, proper assembly techniques, and protection against the elements. In this section, we will provide some helpful tips to ensure your fairy house stands the test of time.
One of the most important aspects of a durable fairy house is the choice of materials. Polymer clay is a popular option, as it’s weather-resistant, easy to work with, and comes in a variety of colors. Styrofoam can also be used as a lightweight and affordable base, but it’s essential to cover it with a protective layer, like a Mod Podge, to prevent it from degrading over time.
Another material worth considering is concrete, which is perfect for outdoor fairy houses. Concrete fairy houses are long-lasting (often lasting for years with minor repairs) and have a realistic appearance. Keep in mind, though, that working with concrete involves a learning curve, and it can be a bit challenging for beginners.
To build a long-lasting fairy house, it’s crucial to use strong adhesives. Wood glue, for example, works well for assembling craft sticks and twigs. However, for heavier or more slippery materials, like stones or tiles, use a more robust adhesive like construction adhesive or epoxy.
Don’t forget about the finishing touches. Once you have assembled your fairy house, protect the exterior with an appropriate sealant. Spray varnish can be used for natural materials, while polymer clay can be baked to create a hardened finish. You might also want to introduce weather-resistant features like a small overhang or roof to shield the entrance from rain.
In conclusion, building a durable and long-lasting fairy house requires thoughtful planning and selection of materials. By following these tips and using materials like polymer clay, styrofoam, or concrete, you’re well on your way to creating a fairy house that lasts for years to come.
Budget-Friendly Ideas
Creating a whimsical DIY fairy house doesn’t have to be expensive. There are several budget-friendly options available that utilize simple materials such as popsicle sticks, craft sticks, and scraps of wood.
Begin by looking for low-cost supplies at discount stores like Dollar Tree. They often carry a variety of fairy garden houses, accessories, and figurines, along with essentials like river rocks, pebbles, and colored crushed glass.
A popular option for constructing a DIY fairy house is using popsicle sticks or craft sticks. They can easily be cut, painted, and glued together to create charming walls, roofs, and even furniture for your project. Offering flexibility and affordability, these sticks allow you to experiment with various styles and designs.
Another affordable material is scrap wood. Collect small pieces of wood, such as those leftover from a home improvement project, to build the main structure of your DIY fairy house. You can also create a planter using a small, discarded wooden box to house your fairy garden. Add some soil and small plants, and you will have a unique and eye-catching addition to your space.
When selecting decorations for your fairy house, look for inexpensive or natural items you can find around your yard or on a nature walk. Pebbles, small stones, twigs, and acorn caps make excellent embellishments for your house. Paint them in bright colors to achieve an enchanting look or keep them natural for a more rustic feel.
By using these budget-friendly ideas and materials, you can create a stunning DIY fairy house without breaking the bank. Enjoy the process, let your imagination run wild, and create a one-of-a-kind enchanting space to entertain and inspire.

Inspirations and Ideas
Coming up with an inspiration for a DIY fairy house can be as simple as taking a walk through your garden or browsing fairy house pictures online. The main goal of this imaginative project is to unleash your creativity and build a captivating miniature house for the enchanting inhabitants of a fairy garden. Here are some ideas to get you started.
One way to find inspiration is to create a sketch of your DIY fairy house. This can serve as a blueprint for your project and help you visualize how it will look when finished. You can start by browsing images of fairy house ideas for that spark of inspiration needed to kick-start your project.
Integrating natural materials, such as twigs, leaves, and stones, can add authenticity to your fairy garden. Watch this video tutorial on how to make a fairy house out of nature to learn about the different building materials you can use and how to put them together.
A tiny hammock can be an exciting addition to your fairy house landscape. Use a piece of fabric or even a leaf to create this whimsical piece of furniture. You can also add miniature plants and flowers to your fairy house design to make it look more inviting and attractive.
To give your fairy house a unique touch, consider using watercolor paper for the walls or roof. First, paint the paper with your desired colors and let it dry. Once the watercolor paper is ready, cut it into the shape of your fairy house walls and roof, then attach it to your project. This technique can give your fairy house a charming, hand-painted appearance that is sure to delight.
By using your creativity and exploring different ideas and inspirations, your DIY fairy house will come to life in no time. Just remember to have fun and enjoy the process of making your splendid miniature project.
DIY Fairy House – Wrapping Up
In summary, creating a DIY fairy house can be a fun and engaging project for individuals of all ages. By gathering simple materials such as a jar, twigs, hot glue, paint, and other natural elements from your yard, you can craft a whimsical and enchanting addition to your garden or home. Plus, incorporating a small plant and a miniature figurine can bring life to your fairy house.
There are numerous creative ideas to explore when designing your own fairy house, from using a tree stump as a base to building intricate wall structures with craft sticks. It’s helpful to consider your personal style and preferences, as well as the skill level and time you’re willing to invest in the project.
Lastly, always remember that the process of creating a fairy house should be enjoyable and rewarding. By expressing your creativity and individuality while making use of readily available materials, you’ll successfully craft a unique and charming space for fairies to call home.
DIY Fairy House FAQs
How to create a waterproof fairy house?
To make a waterproof fairy house, use a sturdy and weather-resistant material such as stones, rocks, or slates to create the structure. Seal gaps and small openings using a clear waterproof sealant or exterior wood glue. For the roof, consider using materials such as tree bark, shingles, or metal sheets that provide good water protection. For additional weather resistance, apply a clear water sealant to the entire fairy house.
What materials can be used for an outdoor fairy house?
For an outdoor fairy house, use materials that are weather-resistant and durable. Some suitable options include twigs, branches, stones, rocks, wood, clay, or concrete. You can also incorporate artificial materials such as plastic or resin. Decorate the house with waterproof paints and outdoor embellishments to enhance its appearance and withstand the elements.
How to construct a fairy house using natural elements?
Building a fairy house using natural elements involves collecting tree bark, twigs, leaves, stones, and moss from your surroundings. Begin by creating a base with flat stones, followed by walls made of sticks and small rocks or mud. Construct the roof with overlapping tree bark or large leaves to provide shelter. Finally, adorn the fairy house with small details like pebbles, moss, and pinecones for added charm.
What are some creative fairy house ideas for a garden?
There are numerous creative fairy house ideas for your garden. Consider building a tree stump fairy house using a hollowed-out tree stump as the base. Alternatively, try constructing miniature cottages from stones, wooden birdhouses, or even upcycled materials like teapots or planter pots. Nestle your fairy house among flowers or hide it in a small nook near a pathway for a whimsical surprise.
How to build a simple fairy house for kids?
When building a simple fairy house for kids, focus on accessible and easy-to-work-with materials. Try using a small cardboard box or shoebox as the base and have children decorate it with paint, markers, or stickers. Encourage them to use their imagination and add natural elements such as twigs, leaves, or flowers to create doors, windows, and decorations. Remember to maintain adult supervision when using tools or adhesives.
What are some tips for adding a fake pond to a fairy garden?
To create a fake pond for your fairy garden, you may use a shallow container or a cut piece of plastic sheeting. Fill the container or lay the plastic sheeting in a small depression in the garden and pour clear craft resin or blue-tinted gel candle wax within to simulate water. Arrange stones and pebbles around the edges for a natural appearance,